 Pin
Pin My daughter spotted this bunny cake in a magazine and wouldn't stop talking about it for weeks. I'll admit, when I first saw the coconut fur and jelly bean details, I thought it looked impossibly complicated, but then I realized it was just two round cakes and some creative cutting. What drew me in wasn't the difficulty—it was imagining her face when she saw it on the breakfast table that Easter morning, still groggy and suddenly wide awake.
That Easter Sunday, my sister helped me frost the cake while my niece watched from a stool, giving directions like a tiny pastry chef. We were laughing so hard when I accidentally dropped a jelly bean on the floor and we had to fish it out of the coconut pile, and somehow that moment—messy and imperfect—made the whole thing feel more real and special than any picture-perfect dessert ever could.
Ingredients
- All-purpose flour (2 1/2 cups): The foundation for a crumb that's tender without being dense; make sure to spoon and level rather than scoop directly from the bag.
- Baking powder and baking soda (2 1/2 tsp and 1/2 tsp): These two work together to give you a light cake that rises beautifully without any flat spots.
- Salt (1/2 tsp): Don't skip it—salt amplifies the vanilla flavor and balances the sweetness in a way you won't consciously notice but will definitely taste.
- Unsalted butter (1 cup for cake, 1 cup for frosting): Softened to room temperature is the magic here; it creams up properly and creates that signature fluffy texture.
- Granulated sugar (1 3/4 cups): This dissolves into the butter, creating the air pockets that make the cake light and airy.
- Large eggs (4, room temperature): Room temperature eggs incorporate more smoothly and create better structure; take them out of the fridge 30 minutes before you start.
- Vanilla extract (1 tbsp for cake, 2 tsp for frosting): Real vanilla makes a noticeable difference in the flavor profile.
- Whole milk (1 cup): The alternating method with flour keeps the batter from becoming tough.
- Powdered sugar (4 cups, sifted): Sifting removes lumps and ensures your frosting is silky smooth, not grainy.
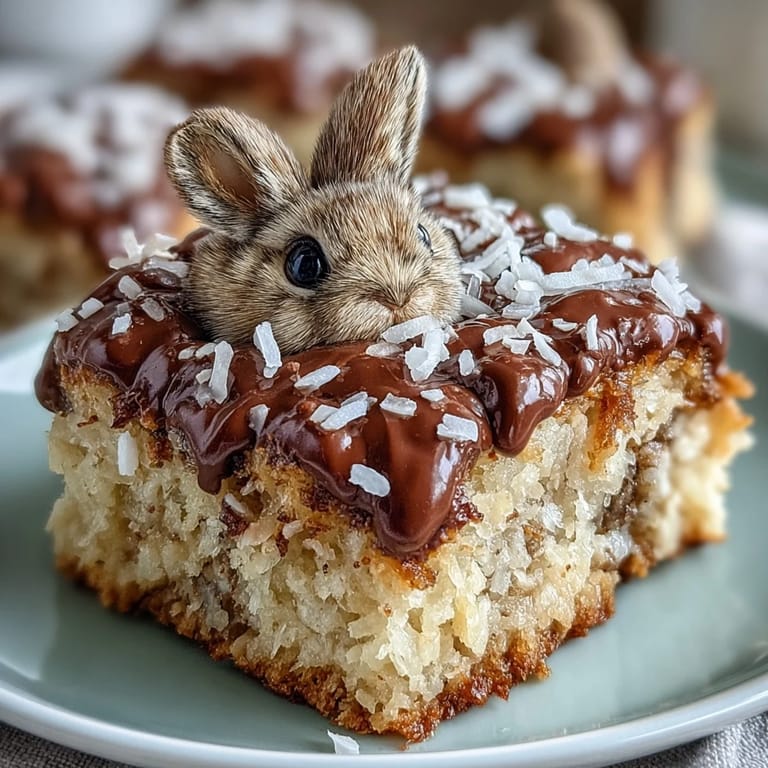
- Sweetened shredded coconut (2 cups): This becomes the bunny's fur and honestly makes the cake look way more impressive than it actually is to make.
- Jelly beans (assorted colors): The large pink one is the tail, white ones become paws, small pink ones are paw pads, and the chocolate chips or black ones are eyes—let yourself have fun arranging them.
Tired of Takeout? 🥡
Get 10 meals you can make faster than delivery arrives. Seriously.
One email. No spam. Unsubscribe anytime.
Instructions
- Prep your pans and preheat:
- Get your oven to 350°F and grease those round pans well—nothing's worse than cake sticking to the sides halfway through baking. This ten minutes of prep work prevents an hour of regret.
- Mix your dry ingredients:
- Whisk the flour, baking powder, baking soda, and salt together in a medium bowl; this distributes the leavening agents evenly so your cake rises smoothly. Set it aside and don't skip this step—it matters more than you'd think.
- Cream butter and sugar:
- Beat them together until the mixture looks pale, fluffy, and almost mousse-like; this usually takes 3 to 4 minutes with an electric mixer. You're essentially whipping tiny air bubbles into the butter, which is what makes the cake light instead of dense.
- Add eggs one at a time:
- Drop each egg in separately and beat it fully before adding the next one; this prevents the mixture from looking curdled or broken. Once all four are in, add the vanilla and beat until everything's combined and smooth.
- Alternate wet and dry ingredients:
- Start with some of the dry mixture, then milk, then dry again, always ending with dry; this technique keeps the batter smooth and prevents overmixing. Pour it evenly into both pans and tap them gently on the counter to release air bubbles.
- Bake until golden:
- Bake for 30 to 35 minutes, watching for a light golden color and using the toothpick test to check doneness. The moment it comes out clean is the moment you take it out—not a minute later, or you'll dry out the cake.
- Cool with patience:
- Let the cakes rest in the pans for 10 minutes before turning them out onto a wire rack; this prevents them from cracking or falling apart. Give them a full cool-down before frosting—warm cake and frosting don't mix well.
- Make the frosting:
- Beat softened butter until it's pale and creamy, then gradually add the sifted powdered sugar so you don't create a cloud of sugar dust everywhere. Add vanilla and just enough milk to get a spreadable consistency—too much milk makes it runny.
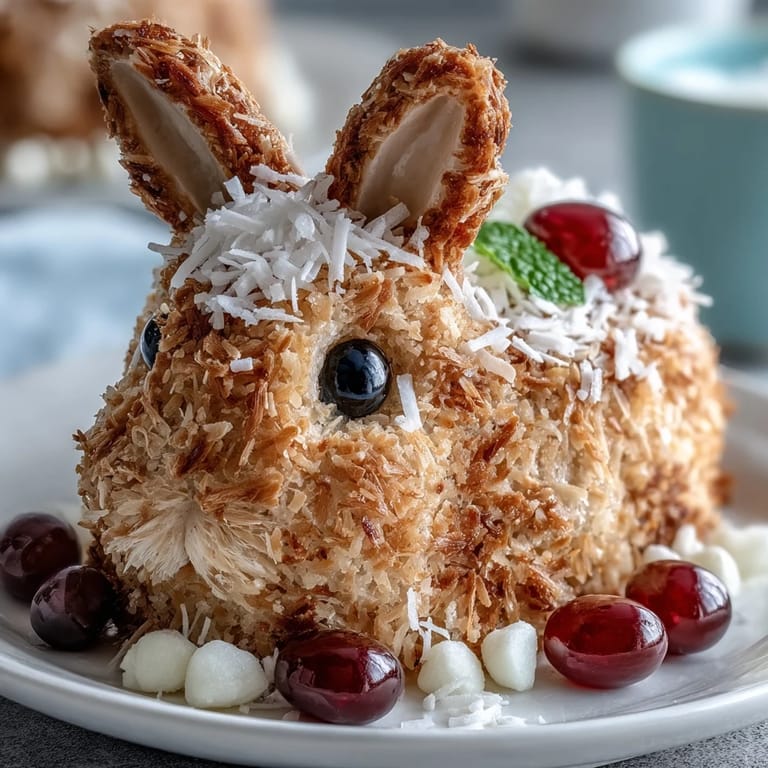
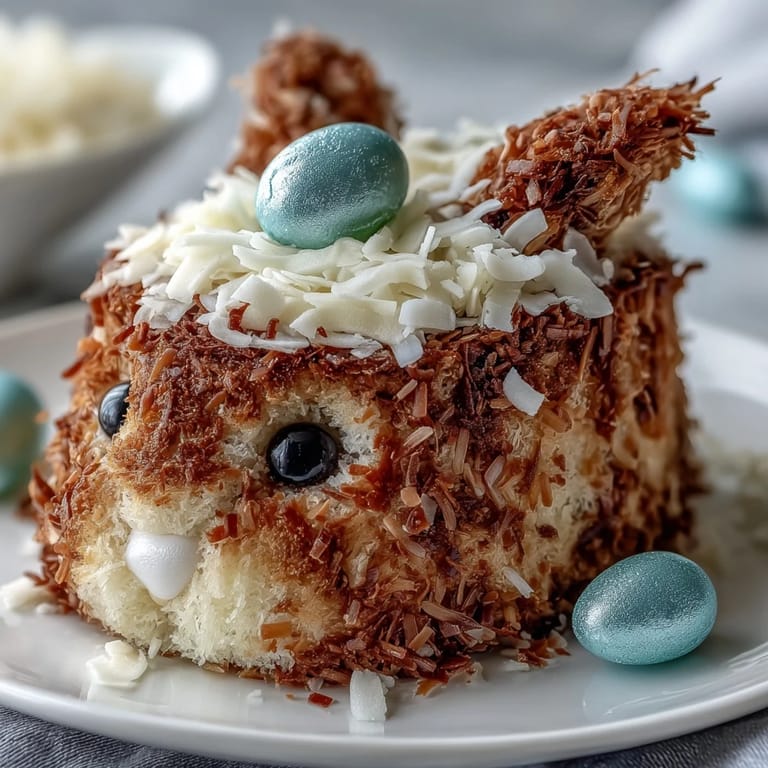
- Shape your bunny:
- Place one whole cake round as the body, then cut the other cake into two semicircles for the back and head, standing them upright at one end. Cut two ear shapes and two paw shapes from leftover cake scraps or trim, attaching everything with frosting like an edible puzzle.
- Frost the whole thing:
- Be generous with the frosting here; you want a thick, even layer that'll hold the coconut. Use an offset spatula or the back of a butter knife, and don't worry about perfection—the coconut will cover any rough spots.
- Add the coconut fur:
- Press handfuls of shredded coconut all over the frosted cake, working section by section so the frosting doesn't dry out before you're finished. This is the part where it magically transforms from abstract cake shapes into an actual bunny.
- Decorate with personality:
- Add the large pink jelly bean as the tail at the back, place white and small pink jelly beans on the paws, and press chocolate chips or black jelly beans in for eyes. If you're feeling fancy, tint some coconut pink with food coloring and sprinkle it on the ears for extra detail.
- Chill and serve:
- Refrigerate until you're ready to bring it to the table, which keeps everything set and looking sharp. Transport it carefully if you're bringing it to a gathering—jelly beans can shift if you're not gentle.
 Pin
Pin There's something unexpectedly moving about serving a cake that looks like it has a personality. My nephew bit off the tail first (the jelly bean), and watching him giggle at that small rebellious act reminded me that food isn't just about taste—it's about the stories we create around it.
Flavor Variations That Work
Once you've made this cake once, you'll start thinking about tweaks. I tried almond extract instead of vanilla in the second batch, and it gave the whole thing this subtle sophistication that still felt festive. Lemon extract is another direction that works beautifully, especially if you're making this in spring when citrus feels right. Some bakers add a touch of orange zest to the frosting, which pairs surprisingly well with coconut and jelly beans without overpowering the delicate vanilla cake underneath.
Making It Your Own Without Stress
The beauty of this cake is that it doesn't demand perfection. Your bunny doesn't need symmetrical ears or evenly distributed coconut. In fact, the slightly lopsided, homemade quality is part of what makes kids and guests light up when they see it. If your cake breaks while you're cutting it into bunny parts, frosting fixes almost everything—that's genuinely what it's there for. I've seen bakers use store-bought cake mix and pre-made frosting, and honestly, no one can tell the difference once you add the coconut and jelly beans. The whole point is the creative assembly, not proving you made everything from scratch.
- If one of your cake layers is domed on top, slice it level with a serrated knife before assembling—flat surfaces stick together better.
- Extra jelly beans and coconut mean you can replace any that fall off while decorating without panic.
- Keep the cake in the fridge if your kitchen is warm; cold cake is easier to work with and less likely to crumble.
Storing and Serving with Ease
This cake actually keeps beautifully in the refrigerator for up to three days, covered loosely with plastic wrap so the coconut doesn't dry out. Bring it to room temperature for about 20 minutes before serving if you want the crumb to feel tender; straight-from-the-fridge cake tastes fine but has a slightly firmer crumb. If you're making it ahead for an Easter gathering, bake the cake layers two days early, wrap them individually, and frost and decorate the morning of your event—this eliminates last-minute stress and ensures everything is fresh.
Why Kids (and Adults) Can't Resist It
Beyond the whimsy, this cake is genuinely delicious. The vanilla cake is tender and buttery, the frosting is rich without being cloying, and the coconut adds texture that keeps things interesting with every bite. There's also something about a dessert that looks like it walked right out of a storybook—it makes people smile before they even taste it. That emotional moment, that surprise and delight, is honestly what makes this recipe worth the hour of work.
- Cut thick slices so people can actually see all the decorative detail you worked on.
- Serve it with cold milk or hot tea to balance the sweetness.
- Take a photo before anyone digs in—you'll be proud of this one.
 Pin
Pin This cake teaches you that homemade doesn't mean complicated, and festive doesn't mean fancy. You'll make it again, maybe next Easter, maybe just because someone in your house whispers that they remember how good it was.
Recipe FAQ
- → How do I achieve the fluffy coconut fur effect?
After frosting the dessert, press shredded sweetened coconut evenly over the surface to create a soft, textured fur look that holds well when chilled.
- → What is the best way to shape the bunny components?
Use two 8-inch round layers, cutting one into semicircles for the back and head, and carving ears and paws from the other layer; attach them with frosting for stability.
- → Can the jelly beans be substituted?
Yes, small candies or edible decorations that hold shape and add color can replace jelly beans for the tail and paws.
- → How long should the dessert chill before serving?
Chill the assembled and decorated dessert for at least 1 hour to allow the frosting to set and decorations to adhere firmly.
- → Is the cake suitable for vegetarian diets?
Yes, this dessert contains no meat or gelatin and fits vegetarian guidelines.